Team OpenCode with vLLM on Leafcloud
Deploy a shared AI coding assistant for your entire development team using OpenCode and a GPU server on Leafcloud. This tutorial shows you how to set up a vLLM server running Qwen3-Coder that multiple team members can use simultaneously.
Architecture Overview
┌─────────────────┐     ┌─────────────────────────────────────────┐
│  Developer 1    │     │         Leafcloud GPU Server            │
│  (OpenCode)     │────▶│  ┌─────────┐    ┌──────────────────┐   │
└─────────────────┘     │  │  Caddy  │───▶│  vLLM Server     │   │
                   API  │  │ (HTTPS) │    │  (OpenAI API)    │   │
┌─────────────────┐ Key │  └─────────┘    └──────────────────┘   │
│  Developer 2    │────▶│                          │              │
│  (OpenCode)     │     │                   ┌──────▼──────┐      │
└─────────────────┘     │                   │  NVIDIA A100│      │
        ...             │                   │    (80GB)   │      │
┌─────────────────┐     │                   └─────────────┘      │
│  Developer N    │────▶│                                         │
│  (OpenCode)     │     └─────────────────────────────────────────┘
└─────────────────┘
Prerequisites
Before you begin, ensure you have:
- A Leafcloud account (sign up here)
- Terraform installed (v1.9.8+)
- OpenStack CLI installed (
pip install python-openstackclient) - Optional: HuggingFace token for gated models (get one here)
Step 1: Create Application Credentials
Application Credentials allow Terraform to authenticate with Leafcloud without using your password. This is more secure and recommended for automation.
1.1 Navigate to Application Credentials
- Log in to create.leaf.cloud
- Go to Identity → Application Credentials
- Click + Create Application Credential
1.2 Create the Credential
Fill in the form:
- Name:
OpenCode(or any descriptive name) - Description:
OpenCode vLLM deployment - Secret: Leave empty to auto-generate
- Expiration Date: Optional, set if you want the credential to expire
- Roles: Leave default (inherits your project roles)
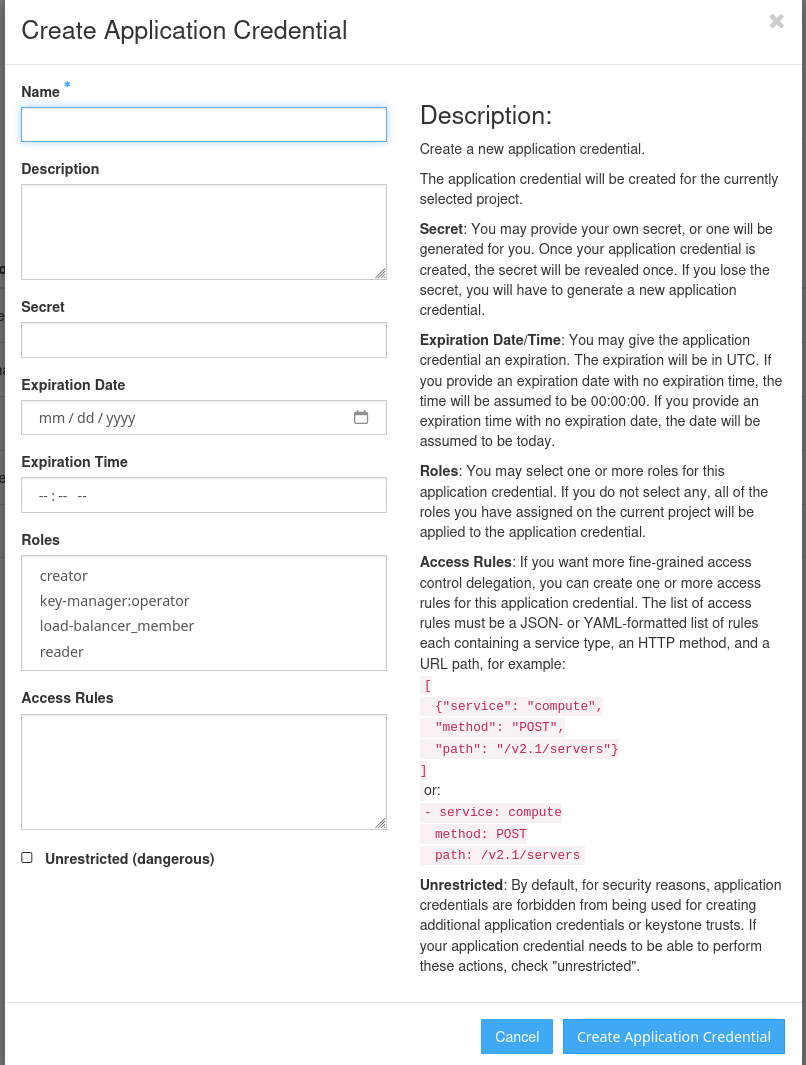
Click Create Application Credential.
Save Your Secret
The secret is only shown once! Make sure to download the clouds.yaml file immediately.
1.3 Download clouds.yaml
After creating the credential, click Download clouds.yaml to save the file.
1.4 Install the clouds.yaml
Move the downloaded file to your OpenStack configuration directory:
Your clouds.yaml should look similar to this:
clouds:
  openstack:
    auth:
      auth_url: https://identity.leaf.cloud:5000/v3
      application_credential_id: "your-credential-id"
      application_credential_secret: "your-secret"
    region_name: "RegionOne"
    interface: "public"
    identity_api_version: 3
    auth_type: "v3applicationcredential"
Cloud Name
The cloud name (openstack in this example) must match the openstack_cloud variable in your Terraform configuration. The default is openstack which is what Leafcloud uses.
Step 2: Verify OpenStack Connection
Before proceeding, verify that your credentials work correctly.
2.1 Test with OpenStack CLI
If this is a new project, you should see an empty list:
+----+------+--------+----------+-------+------+
| ID | Name | Status | Networks | Image | Flavor |
+----+------+--------+----------+-------+------+
+----+------+--------+----------+-------+------+
If you see an error, check that:
- The
clouds.yamlfile is in~/.config/openstack/ - The application credential hasn't expired
- You have the correct permissions in your project
2.2 Check Available GPU Flavors
Verify you can see the GPU flavors:
You should see flavors like:
| ... | eg1.a100x1.V12-84  | 86016 | 20 | 0 |  12 | True  |
| ... | eg1.a100x2.V25-164 | ...   | ...| ...| ... | True  |
| ... | eg1.a30x1.V8-32    | ...   | ...| ...| ... | True  |
Connection Working?
If both commands work, your OpenStack connection is properly configured. Proceed to the next step.
Step 3: Get the Terraform Configuration
Clone or download the Terraform configuration:
Or download the ZIP from Leafcloud's GitHub.
Step 4: Configure the Deployment
4.1 Copy the Example Configuration
4.2 Edit Your Configuration
Open terraform.tfvars in your editor and customize:
# Security: Restrict to your office/VPN IP!
vm_cidr_whitelist = "203.0.113.0/24"  # Replace with YOUR IP range

# GPU Instance (1x A100 80GB is recommended for Qwen3-Coder)
vm_flavor_name = "eg1.a100x1.V12-84"

# Model Configuration
vllm_model = "Qwen/Qwen3-Coder-30B-A3B-Instruct"
vllm_max_model_len = 32768

# Optional: HuggingFace token for gated models
huggingface_token = ""
Security - Important!
Always set vm_cidr_whitelist to your office or VPN IP range. Leaving it as 0.0.0.0/0 exposes your server to the entire internet!
Find your public IP: curl ifconfig.me
4.3 Configuration Options
| Variable | Default | Description |
|---|---|---|
vm_flavor_name |
eg1.a100x1.V12-84 |
GPU instance type |
vllm_model |
Qwen/Qwen3-Coder-30B-A3B-Instruct |
Model to serve |
vllm_max_model_len |
32768 |
Max context length |
vm_cidr_whitelist |
0.0.0.0/0 |
IP whitelist (set this!) |
huggingface_token |
`` | HF token for gated models |
Step 5: Deploy the Infrastructure
5.1 Initialize Terraform
This downloads the required providers (OpenStack, random).
5.2 Review the Plan
Review what will be created:
- 1x GPU VM (A100)
- 1x Block storage volume (200GB)
- 1x Floating IP
- Network and security groups
5.3 Apply the Configuration
Type yes when prompted. The infrastructure deployment takes about 2-3 minutes.
Step 6: Wait for Server Setup
After Terraform completes, the server needs additional time to:
- Install NVIDIA drivers
- Download the vLLM Docker image (~15GB)
- Download and load the model (~60GB for Qwen3-Coder)
This can take 15-30 minutes on first boot.
6.1 Connect via SSH
# Get the SSH command from Terraform output
terraform output ssh_commands

# Connect to the server (use the key from the terraform folder)
ssh -i ./id_rsa ubuntu@<server-ip> -o IdentitiesOnly=yes
6.2 Check Setup Progress
The initial setup takes 10-20 minutes. Here's how to monitor each phase:
During initial setup (before reboot):
# Watch cloud-init progress in real-time
sudo tail -f /var/log/cloud-init-output.log

# Check cloud-init status
cloud-init status
# "running" = still installing, "done" = finished
Monitor disk usage (Docker image is ~15GB):
# Check disk space on /data (should be filling up)
df -h /data

# Watch Docker pull progress
sudo watch -n 2 'docker images && echo "---" && df -h /data'
After the automatic reboot:
# Quick status check
vllm-status

# Watch vLLM startup and model loading
vllm-logs

# Check if vLLM container is running
sudo docker ps

# Monitor GPU usage (model loading uses GPU memory)
watch -n 1 nvidia-smi
Monitor model download (~60GB for Qwen3-Coder):
# Watch the model cache directory grow
watch -n 5 'du -sh /data/models/*'

# Check vLLM logs for download progress
sudo docker logs -f vllm 2>&1 | grep -E "(Downloading|Loading|Progress)"
6.3 Verify Server is Ready
The server is ready when you see in the logs:
You can also test from your local machine:
Should return: OK
Step 7: Get API Credentials
Retrieve the API key and configuration:
# Get the API key (keep this secret!)
terraform output -raw vllm_api_key

# Get the full OpenCode configuration
terraform output opencode_config
Share Securely
Share the API key with your team through a secure channel (password manager, encrypted message, etc.). Never commit it to git!
Step 8: Configure Team Members
Share the following with your team:
- Server IP:
terraform output server_ips - API Key:
terraform output -raw vllm_api_key - Setup guide: Configuring OpenCode Client
Each developer follows the client setup guide to configure their local OpenCode installation.
Recommended Models
| Model | VRAM Required | Best For |
|---|---|---|
Qwen/Qwen3-Coder-30B-A3B-Instruct |
~25GB | Agentic coding, tool calling |
Qwen/Qwen2.5-Coder-14B-Instruct |
~28GB | Faster responses |
Qwen/Qwen2.5-Coder-32B-Instruct |
~64GB | High quality, dense model |
Troubleshooting
Server Not Responding
Check if vLLM is running:
Out of Memory Errors
Reduce the context length in terraform.tfvars:
Then redeploy:
Slow Model Loading
First boot downloads the model (~60GB). This can take 10-30 minutes depending on network speed.
ssh -i ./id_rsa ubuntu@<server-ip> -o IdentitiesOnly=yes

# Watch model download progress
watch -n 5 'du -sh /data/models/* 2>/dev/null'

# Check vLLM logs
vllm-logs

# Monitor GPU memory (model loads into VRAM)
watch -n 1 nvidia-smi
Certificate Warnings
The server uses self-signed certificates. For production, consider:
- Using a domain name with Let's Encrypt
- Adding the certificate to your trust store
Security Best Practices
- IP Whitelisting: Always restrict
vm_cidr_whitelistto your IP range - API Key Rotation: Periodically update
vllm_api_keyand redeploy - VPN Access: Consider deploying within a VPN for additional security
- Audit Logs: Check server logs for unauthorized access attempts
Cost Optimization
- Shutdown when not in use: Stop the instance during off-hours
- Long-term discounts: Contact hello@leaf.cloud for commitment discounts
- Right-size your GPU: A30 is cheaper if you use smaller models
Cleanup
To destroy all resources:
Next Steps
- Explore OpenCode documentation for advanced features
- Check out vLLM documentation for performance tuning
- Learn about Leafcloud's sustainable infrastructure
Related Tutorials
- Configuring OpenCode Client - For team members to set up their local OpenCode
- Setup Private LLM on Kubernetes - Alternative Kubernetes-based setup
- Installing GPU Drivers - Manual GPU setup
- Creating Instances with Terraform - Terraform basics